DIY Hoop Wall Art
 Each Friday we’re featuring a practical idea from a team of creative women who will provide fabulous DIY projects, recipes, money-saving strategies, decorating ideas, holiday activities and even spiritual growth tools that will help you to live your priorities and love your life. We hope it will give you some helpful weekend projects to do alone or with a friend or two.
**************************************************************
 Almost two years ago I painted my kitchen the prettiest shade of blue. My kitchen is “cozy” (code for tiny!) and there really is not much open wall space, except for the wall leading into the hallway. I had a chalkboard print that I knew I wanted to hang on that wall, but I had no idea what else I wanted to put with it.
Last summer before my daughter’s graduation open house I finally just gave up and hung the chalkboard print along with a smaller print thinking that if they were on the wall I would suddenly just be inspired. Fast forward another year and I finally was inspired to finish decorating that wall.
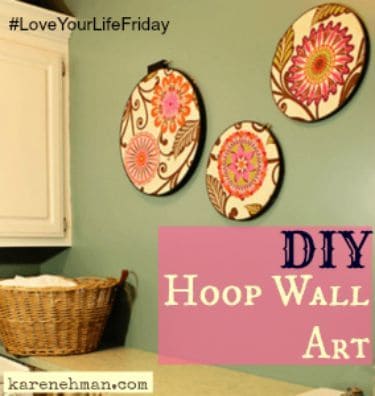

If you don’t sew and don’t have any fabric scraps laying around, never fear – you still have options. Go find one of your crafty friends, offer to bring her coffee and she will probably let you dig through her scrap bin. Another option is to just buy small amounts of fabric from the craft store where you get your hoops. Once you have your fabric picked out, iron all of the pieces. After ironing the fabric I laid it all out on my table to figure out which size hoop to use for each fabric.

Some of the fabric had a print on it that I wanted to highlight, like the cute little owl and the bird, so I found the size of hoop that would just fit them.


To put the fabric in the hoop, you just loosen the screw at the top and take the two pieces of the hoop apart. Lay the smaller inner hoop on your table or workspace, center the fabric over it and then lay the outer hoop over it and press down. You can still work with your fabric and move it around if it’s not perfectly centered. Once you are happy with what you see in the hoop just tighten the screw until the outer hoop is tight over the inner hoop again.


Flip your hoop over and with scissors cut away the excess fabric close to the hoop. Flip your hoop back over and you are finished!


One of the hoops I made with a pocket because I planned to hang it next to our calendar. I’m always looking for a pen to write things on the calendar in my kitchen. By just adding an extra folded piece of fabric over the fabric on the hoop I now have a spot to hold a couple of pens, a highlighter and some sticky notes! For the pocket wall hanging I used the biggest hoop that I had, which was a 12″ hoop. Pick one fabric that will cover the entire hoop. For the pocket you only need a piece as wide as the hoop and about 8-9″ tall. Fold that piece in half the long way and iron the fold.


Lay the folded piece over the whole piece of fabric with the fold toward the top and the loose edges on the bottom over the hoop to make your “pocket”. Lay the outer hoop on top, press down and tighten the top screw. Cut away the excess on the back just like with your other hoops and you are finished!


Now you have a cute wall hanging with a pocket for pens, notes, or even a pair of reading glasses!

These are my finished hoops. The top center one was made with chalkboard fabric and can be written on and erased just like a chalkboard.

I finally love the wall in my kitchen!

If you want something more subtle you could use lace in all of the hoops and let your wall color show through or use crochet doilies for a more vintage look.

If you have a large wall space to fill use fabric with a larger print and a couple of large hoops.

You could also pick a theme to really draw attention to an area.

You really can’t mess these up, just go for it and transform a boring wall space into something fun!
I hope you have fun!
April
*************************************************************
 I’m from a small mid-western town in Michigan where I have lived since I was in elementary school. I married my high school sweetheart and we have two teenage children. I enjoy flower gardening and anything else that I can do outdoors during the summer months. As a family we love to camp all around this beautiful state of Michigan that we call home. When I’m not working full-time at my “real job”, I escape from the everyday stresses of raising teenagers through sewing and crafting. I started my Etsy shop with just aprons and have branched out from there. I’m not afraid to try something new and have several “Pinterest Fails” to show for it!
NOTE FROM KAREN: My home is filled with “April Wilson originals”. She is the crafty woman I wish I could be. :-) Here is a link to some of her homemade items you will LOVE! CLICK HERE FOR APRIL”S SHOP!

